

Off-roading enthusiasts know that the thrill of night riding can be both exhilarating and challenging. As you navigate through rugged terrains, the ability to see your surroundings becomes crucial. One effective way to improve visibility during those dark adventures is by installing rock lights on your Jeep.
Rock lights illuminate the area under your vehicle, ensuring that you can spot obstacles and hazards before they become a problem. This additional light source not only enhances your safety but also adds an element of style to your ride. Whether you’re traversing rocky paths or tackling muddy trails, having proper lighting can make all the difference.
In this guide, we will walk you through the steps to install Jeep rock lights, ensuring that your nighttime riding experience is safe and enjoyable. With proper illumination, you can confidently explore the great outdoors, knowing that you have enhanced visibility no matter the terrain.
Selecting the Right Rock Lights for Your Jeep

When it comes to enhancing your off-road experience, choosing the right rock lights for your Jeep is essential. The primary function of these lights is to improve visibility during nighttime rides, allowing you to navigate tricky terrains with confidence. The first factor to consider is brightness; look for LED lights with a high lumen output that can illuminate the ground effectively.
Next, examine the beam pattern. A wider beam can provide better coverage, ensuring that you don’t miss any obstacles while riding in the dark. Some rock lights offer adjustable angles, allowing you to customize the light direction based on your needs. Durability is another critical aspect since these lights will be exposed to rugged conditions. Opt for models that are waterproof and resistant to impacts to withstand the rigors of off-road adventures.
Additionally, consider the color of the lights. While white lights are excellent for visibility, colored options can add a unique aesthetic to your Jeep at night. Keep in mind that the legal regulations for light colors can vary by location, so be sure to check local laws before making a choice.
Lastly, ease of installation is vital. Some rock lights come with plug-and-play options, making the setup process straightforward. Research each product’s installation requirements to ensure you can install them without complications. By selecting the right rock lights tailored to your riding habits, you will significantly enhance your off-road experience under the moonlit sky.
Preparing Your Jeep for Rock Light Installation
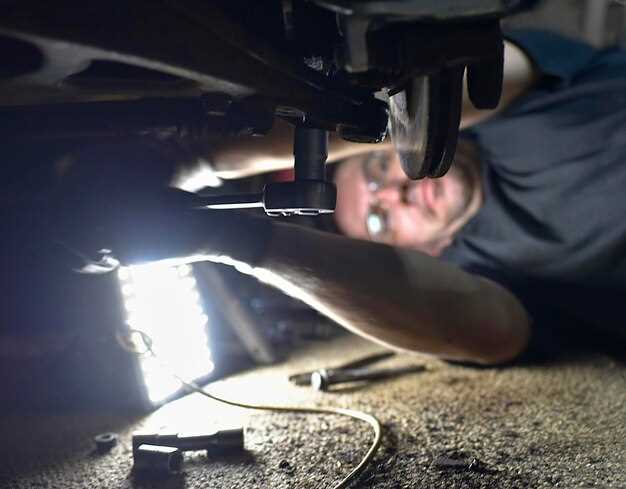
Before installing rock lights on your Jeep, it’s crucial to ensure that your vehicle is ready for the enhancement. Start by selecting the appropriate location for your lights, usually around the wheel wells or undercarriage, to provide maximum visibility while riding on rocky terrains at night.
Next, gather all necessary tools and materials. You will need rock lights, wiring, connectors, and possibly a power source like a switch or relay. Check your Jeep’s electrical system to ensure it can handle the additional lights without overloading. If you’re unsure, consulting an expert can prevent potential issues.
Additionally, clean the areas where you plan to install the lights thoroughly. Remove any dirt or debris to allow for better adhesion and visibility. Ensuring proper placement not only enhances functionality but also contributes to the stylish look of your Jeep.
Lastly, familiarize yourself with the installation instructions provided with your rock lights. Understanding the wiring and mount points will simplify the process and guarantee that your lights are installed correctly. Proper preparation will enhance your off-road experience, making nighttime adventures safer and more enjoyable.
Installation Steps for Jeep Rock Lights
Installing rock lights on your Jeep can significantly enhance your night riding experience by providing better visibility on off-road trails. Follow these steps to ensure a successful installation:
- Gather Necessary Tools and Materials
- Rock lights kit
- Wire connectors
- Wiring harness
- Switch (optional)
- Drill and drill bits
- Screwdriver
- Electrical tape
- Zip ties
- Socket wrench
- Prepare Your Jeep
Before starting the installation, park your Jeep on a flat surface and disconnect the battery to ensure safety while working with electrical components.
- Choose Locations for the Rock Lights
Select ideal mounting points for the lights. Common positions include:
- Under the front bumper
- Near the wheel wells
- On the rear axles
- Under the body of the Jeep
Ensure the lights are placed where they will illuminate the ground effectively while avoiding obstacles.
- Install the Rock Lights
Use the drill to create holes for mounting brackets if needed. Secure each light using the included screws or brackets. Ensure they are firmly attached and positioned correctly.
- Connect the Wires
Carefully connect the wiring according to the manufacturer’s instructions. Typically, this involves:
- Joining the positive wire of the light to the power source
- Connecting the negative wire to the ground
- If using a switch, install it in a convenient location inside the Jeep
Use wire connectors to ensure strong connections and wrap with electrical tape for added durability.
- Test the Lights
Before securing all connections, reconnect the battery and test the lights. Ensure they turn on and provide adequate illumination. If not, check your wiring connections.
- Secure and Clean Up
Once tested, tidy up any excess wires using zip ties to prevent hanging. Make sure all connections are insulated and secure to avoid potential damage while riding.
With these installation steps, your Jeep will be equipped with rock lights, enhancing visibility during night rides and making your off-road adventures safer and more enjoyable.
Wiring and Powering Your Rock Lights Safely
Installing rock lights on your Jeep significantly enhances visibility during night off-road adventures. Proper wiring and powering of these lights are crucial for safe and efficient operation. Here are some essential steps to consider:
- Select the Right Location: Choose mounting spots for your rock lights that will effectively illuminate the area beneath and around your vehicle without obstructing other components.
- Gather Necessary Equipment: Ensure you have the right tools and materials, including wire connectors, a fuse, a relay, and weather-resistant wiring to protect your setup from elements.
- Understand Power Requirements: Check the voltage and amperage ratings of your lights to determine the appropriate power source. Most rock lights operate on a 12V system.
Follow these steps to wire your rock lights properly:
- Disconnect the Battery: For safety, always disconnect the vehicle’s battery before starting any wiring work.
- Run Wires: Route your wires from the chosen lights back to a central point where you will connect to power. Keep wiring secure and away from moving parts.
- Connect to Power Source: Use the battery or a switched power source for your lights. Ensure connections are solid and insulated to prevent short circuits.
- Install a Fuse: Add a fuse to protect your circuit. Select a fuse that matches the amperage of your lights to avoid burning out components.
- Add a Relay: If your setup requires it, use a relay to handle the power draw from your lights, ensuring the switch can handle the load.
Lastly, after all connections are made, reattach the battery, and test the lights to confirm everything is functioning correctly. This ensures you can enjoy enhanced visibility during night excursions without compromising safety.
Tips for Optimal Rock Light Placement on Your Jeep
When enhancing your Jeep’s off-road capabilities with rock lights, placement is key for achieving the best visibility during nighttime rides on rugged terrains. Consider positioning your lights low to the ground, which helps to illuminate obstacles and rocks directly in your path. This low placement also reduces glare while providing a clear view of the ground ahead.
Install rock lights strategically on both the front and rear of your Jeep. Placing lights at the front will help you see upcoming rocks and undulations, whereas rear lights ensure visibility for those behind you, creating a safer riding experience in dark environments.
Additionally, aim for placement that maximizes the coverage area. Installing lights on the fenders or undercarriage can significantly enhance the visibility of wheel placement, allowing you to easily navigate through challenging spots without risking damage to your vehicle.
Consider the angle of the lights as well. Adjustable mounts allow you to direct the light where it’s most needed, thereby reducing blind spots caused by shadows from the vehicle. Experimenting with different angles during daylight can help you find the optimal orientation for nighttime conditions.
Lastly, ensure that the wiring is secured and protected from mud and debris. Consider routing cables along the frame or using protective sheathing to prevent damage while riding over rocks and other rough surfaces. Proper installation will not only enhance visibility but also prolong the life of your lights.
Maintaining Your Rock Lights for Longevity
To maximize the lifespan and performance of your Jeep rock lights, regular maintenance is essential. Proper care not only enhances visibility during off-road riding but also ensures that your investment stands the test of time. Below are key maintenance steps to keep your rock lights in optimal condition.
| Maintenance Task | Description |
|---|---|
| Regular Cleaning | Remove dirt, mud, and debris from the lights using a soft cloth or brush. Avoid harsh chemicals that could damage the lens. |
| Inspect for Damage | Regularly check for scratches, cracks, or loose connections. Any visible damage should be addressed immediately to prevent further issues. |
| Sealant Application | Consider applying a waterproof sealant around the light fixtures to protect against moisture ingress, especially after harsh riding conditions. |
| Wiring Check | Inspect all wiring connections for wear or corrosion. Replacing any faulty components will ensure reliable performance during nighttime off-road adventures. |
| Regular Testing | Periodically turn on the rock lights to ensure they are functioning properly. Address any flickering or dimming immediately. |
Following these maintenance tasks will help ensure that your rock lights remain bright and effective for all your off-road riding experiences. Remember, a little effort goes a long way in preserving the functionality of your lights.


