

When you’re out on an off-road adventure, the last thing you want is to be unprepared for a flat tire or low air pressure. Having a portable air compressor at your disposal can make a world of difference. It not only allows you to quickly inflate your tires but also serves as an essential tool for various repairs that may arise during your journey. This guide will walk you through the straightforward process of installing a portable air compressor in your Jeep, ensuring you’re always ready for any challenge on the trail.
The installation of a compressor in your Jeep enhances your vehicle’s off-road capabilities. Whether you’re navigating rocky mountains or sandy dunes, maintaining the right tire pressure is crucial for optimal performance. A well-installed portable air compressor provides easy access whenever adjustments are needed, allowing you to tackle off-road conditions with confidence.
In the following sections, we will outline the necessary tools and steps to effectively install your air compressor. By integrating this handy device into your Jeep, you’ll not only be prepared for emergencies but also elevate your repair game on the road. Let’s get started on ensuring that your off-road experience is as smooth as possible!
Choosing the Right Portable Air Compressor for Off-Road Use
When selecting a portable air compressor for off-road use, it’s essential to assess your specific needs for repair and inflation tasks. Off-road adventures often mean dealing with lower tire pressures for improved traction on rugged terrains, which may require frequent adjustments to tire inflation levels. A suitable compressor should be able to quickly and efficiently increase tire pressure, especially after navigating through obstacles.
Look for a compressor with a sturdy build and a high CFM (cubic feet per minute) rating; this ensures it can handle inflating larger tires commonly found on off-road vehicles. Additionally, a compressor that operates on a 12V DC power source is advantageous, providing convenience by connecting directly to your Jeep’s battery.
Moreover, portability is crucial. You want a lightweight and compact unit that can be easily stored and accessed during your adventures. Consider models with built-in LED lights or pressure gauges for added functionality during nighttime repairs or tire checks.
Lastly, check for user reviews and reliability ratings, as off-road conditions can be demanding on equipment. Investing in a quality air compressor will not only make repairs more manageable but will also enhance your overall off-road experience.
Necessary Tools and Materials for Installation
To successfully install a portable air compressor in your Jeep, you’ll need to gather specific tools and materials that ensure a smooth and efficient process. This preparation will greatly aid in any future repair tasks as well.
First, ensure you have a reliable portable air compressor ready for installation. Choose a model that’s compatible with your Jeep and suitable for your intended use, such as inflating tires or powering air tools.
Next, gather essential tools: a set of wrenches, screwdrivers (both flat and Phillips), and pliers will help you tackle various fasteners. A drill with the appropriate drill bits may be necessary for creating mounting points and securely attaching the compressor.
You will also need a mounting bracket or platform, which provides a stable base for the compressor. Ensure the bracket is made from durable materials to withstand off-road conditions. Additionally, consider using rubber spacers to reduce vibration during operation.
For electrical connections, prepare the necessary wiring and connectors. Heavy-duty wire suitable for automotive use is essential for safe and efficient operation. A fuse or circuit breaker should also be included to protect the compressor from electrical surges.
Lastly, keep a set of zip ties and electrical tape handy for securing wires and ensuring a clean installation. These materials contribute to both the functionality and safety of your air compressor setup.
Step-by-Step Guide to Mounting the Air Compressor
Installing a portable air compressor in your Jeep can enhance your off-road adventures by providing the necessary equipment for quick repairs and tire inflation. Follow these steps to mount your air compressor securely and efficiently.
First, select a suitable location inside your Jeep for the compressor. Common spots include under the passenger seat or in the trunk area. Ensure that the chosen area is dry and free from any potential hazards while driving off-road.
Next, gather the necessary tools: a drill, mounting brackets, screws, and a wrench. If your air compressor comes with a mounting kit, refer to the instructions provided. If not, you may need to create a custom bracket to hold the compressor in place securely.
Once you have your tools ready, position the compressor in the selected mounting area. Mark the locations for the screws or bolts using a marker, and then carefully drill holes in the Jeep’s floor or side panel. Make sure to choose a drill bit that corresponds with the size of your screws for a secure fit.
After drilling, place the compressor in position and attach it using the screws and brackets. Tighten them sufficiently to hold the compressor firmly in place, but be cautious not to overtighten as this may damage the mounting surface.
Next, connect the compressor to the Jeep’s power source. Locate a suitable 12V power outlet within your vehicle, which is essential for the compressor operation. If necessary, run a power wire from the compressor to the battery, ensuring that the connections are secure and insulated to prevent any electrical issues during your off-road excursions.
Lastly, test the compressor to verify its functionality. Inflate a tire or use the compressor to test for air leaks. Ensure that all connections are secure and that the compressor is easily accessible for future repairs or tire inflation on your adventures.
By following these steps, you will have successfully mounted a portable air compressor in your Jeep, enhancing your capability to handle off-road challenges effectively.
Connecting the Air Compressor to Your Jeep’s Power Source
When installing a portable air compressor in your Jeep, connecting it to the vehicle’s power source is a crucial step. Most portable compressors are designed to be powered using the vehicle’s battery. To begin, ensure you have the necessary tools, including a set of jumper cables or a power connection kit appropriate for your compressor model.
Locate the battery in your Jeep. It is often situated under the hood, but consult your owner’s manual for the exact location. After confirming the battery terminals are clean and free from corrosion, proceed to connect the compressor. Use the positive (red) jumper cable to connect to the positive terminal of the battery. Then, attach the negative (black) jumper cable to a ground point on the Jeep’s chassis or the negative terminal of the battery.
Before turning on the compressor, double-check all connections to ensure they are secure. A loose connection could lead to malfunction or even damage to the compressor and your Jeep’s electrical system. Once everything is securely connected, you can plug in the compressor and start using it to inflate tires or power air tools.
Remember to monitor the compressor during use to prevent overheating. In case of a repair or adjustment, always disconnect the power first to avoid electrical shock. Following these steps will ensure a safe and effective connection between your air compressor and your Jeep’s power source, enhancing your off-road adventures.
Testing the Air Compressor Functionality Post-Installation

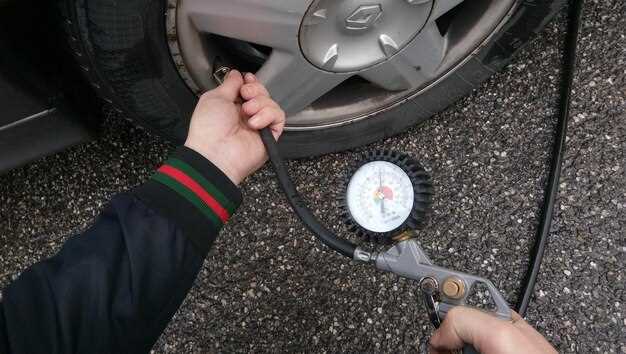
After successfully installing your portable air compressor in your Jeep, it is crucial to test its functionality to ensure optimal performance in off-road conditions. Start by locating a suitable tire, preferably one that is deflated slightly or has lost pressure. This will provide a practical scenario for testing the compressor.
Connect the air compressor to the tire valve securely, making sure there are no leaks in the connection. Turn on the compressor and observe its operation. A properly functioning unit should begin inflating the tire immediately without any unusual sounds or vibrations. Listen for an even, consistent noise, which indicates that the compressor is working efficiently.
While the compressor is running, monitor the tire pressure using a gauge. Ensure the compressor reaches the desired PSI level without excessive strain or overheating. This step is essential, as it simulates the demands the compressor will encounter during off-road adventures. If the compressor struggles or takes an extended time to inflate, it may need further inspection or repair.
Once the tire reaches the desired pressure, disconnect the compressor and check for any signs of air leakage around the valve. Additionally, assess the compressor for any signs of overheating or damage. Conducting these tests will confirm that your air compressor is ready for off-road use, providing the necessary support for tire maintenance in various driving conditions.
Maintaining Your Air Compressor for Long-Term Performance
To ensure your portable air compressor remains reliable and efficient, regular maintenance is essential. This will not only enhance its performance during off-road adventures but also extend its lifespan, reducing the need for frequent repairs.
Here are some critical maintenance tips for your air compressor:
- Regular Inspection: Frequently check all components for wear and tear. Look for cracks, loose fittings, and corroded connections.
- Clean the Air Filter: A dirty air filter can restrict airflow and reduce efficiency. Clean or replace the filter according to the manufacturer’s instructions.
- Check the Oil Level: If your compressor is oil-lubricated, ensure the oil level is adequate. Change the oil regularly to prevent internal damage.
- Drain Moisture: Moisture buildup in the tank can lead to rust and other problems. Make it a habit to drain the tank after each use.
- Inspect Hoses and Connections: Check for leaks or damage in hoses and connectors. Replace any compromised components immediately to prevent air loss.
Implementing these maintenance practices will help maintain your air compressor’s performance during critical off-road applications. Remember, a well-maintained compressor is less likely to require significant repairs, ensuring smoother operations on your adventures.
Lastly, always refer to the manufacturer’s manual for specific maintenance guidelines tailored to your compressor model for optimal results.


